I’ve been using ad-blockers in my browser for a long time. Not only for ad-blocking puproses, but also to reduce tracking. Installing an ad-blocker was easy. It always bothered me though, that I had an ad-blocker only on my laptop. I heard about Pi-hole, a network-wide adblocker, a while back and always wanted to run one. The Pi-hole blocks ads by blocking the corresponding DNS queries. However, since I didn’t have a Raspberry Pi lying around, I postponed this project over and over.
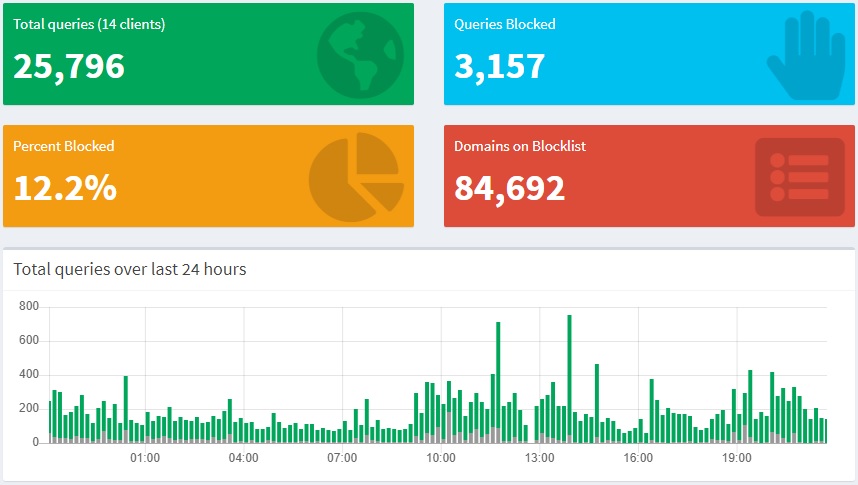
After setting up my first Raspberry Pi for some home automation, I finally also installed a Pi-hole on this Pi. The results were totally surprising to me. While I expected ads to be gone, looking at the dashboard showed me how throughougly my devices were tracking my activities. I was especially shocked about how much my smart TV is tracking everything I watch. I wasn’t aware of this and most certainly do not agree with this. So the Pi-hole was set-up to stay.
However, my requirements regarding home automation changed in the meantime and I need a dedicated Pi just for this purpose. So an additional one for the Pi-hole is needed. As this Pi should be close to my router, I thought why not use the router’s USB port to power my Pi? I have a FritzBox 6490 (FritzBox is a common router in Germany) and the USB port provides 500mA. This should be sufficient, because a Pi solely running Pi-hole doesn’t need a lot of energy. It goes without saying that I don’t need one of the newer Pis with more and more incredible specs. For this use-case a Pi Zero should be more than enough. It’s a tiny Pi perfectly tailored for this project:
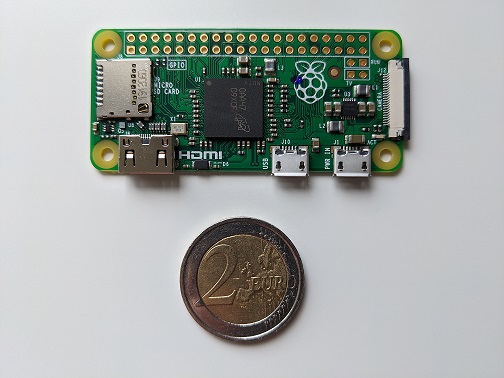
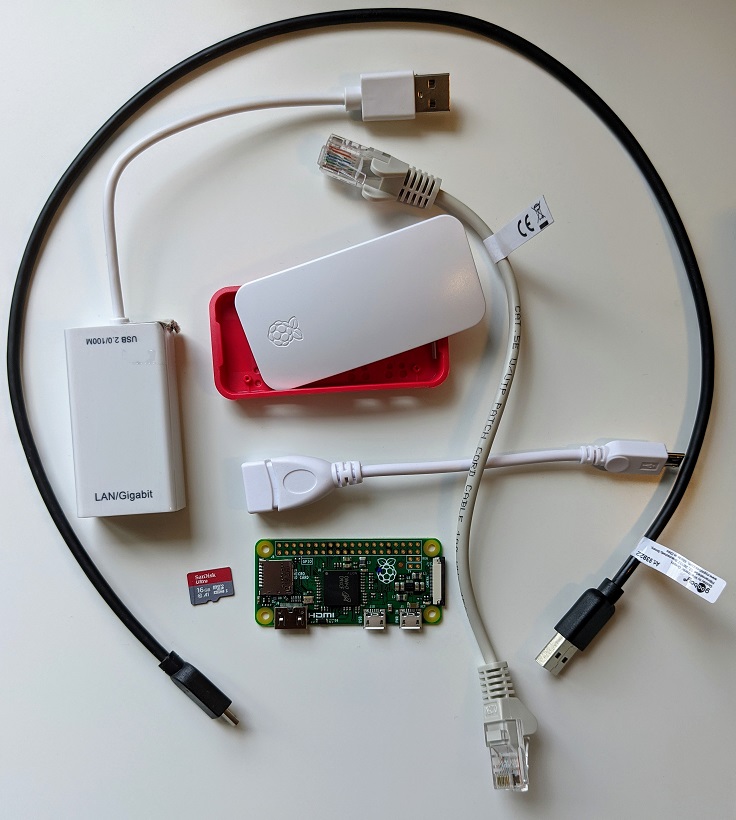
As we can see in the picture, the Pi Zero doesn’t come with a lot of ports. It has one Micro-USB port for power supply and another one to connect a device. Since the Pi Zero has no ethernet port, we’ll need this USB port for an ethernet adapter. If you want to connect your Pi-hole via Wifi instead, I recommend to get the Pi Zero W which has WiFi onboard. However, I strongly advice to connect the Pi-hole via Ethernet, because it’s more reliable. This image shows everything I used to set-up the Pi-hole:
| Component | Price |
|---|---|
| Raspberry Pi Zero v1.3 | 5.57€ |
| USB to Ethernet converter | 9.90€ |
| Micro-USB to USB adapter (OTG adapter) | 1.80€ |
| MicroSD card (I used 16GB, as this was the smallest sold at that shop) | 5.20€ |
| (Optional) Case for Pi Zero | 6.00€ |
| USB to Micro-USB power cable 0.60cm | 0.79€ |
| CAT 5e cable 0.25cm | 0.34€ |
| 29.60€ |
Step by step instructions
- Download Raspberry Pi OS (32-bit) Lite from the offical site.
- Extract the downloaded .zip file.
- Download and install balenaEtcher.
- Open balenaEtcher, select the .img file from the extracted Pi OS, select the SD card that you inserted into your PC, and flash the image to the SD card.

- Put the microSD card into your Pi Zero.
- Put the Micro-USB cable into the right port of your Pi.
- Connect the OTG adapter to the Ethernet adapter and put it into the other micro-USB port of your Pi.
- Connect the ethernet cable to your Pi and router.
- Connect the Micro-USB cable to a power supply (e.g. your router’s USB port).
- Wait a bit and check if everything works by logging into your router’s admin UI at fritz.box and look for the Pi as connected to your network.
- Enable “Advanced View” by clicking the three dots in the top right corner.
- Go to “Home Network - Network” and click on the edit button in the row with your Pi.
- Enable a static IP address by checking “Always assign this network device the same IPv4 address”.

- If you want you can also assign another IP address, but first make sure that it’s not used by another device.
- Disconnect the Pi from power supply and put the microSD card into your computer again.
- Enable SSH access to your Pi by creating an empty file called “ssh” (without file extension!) on the SD card.

This can also be done before you connect the Pi the first time, but then restart the Pi after you changed the IP address. You can restart the Pi by simply unplugging power. - Download and install Putty. Afterwards start it.
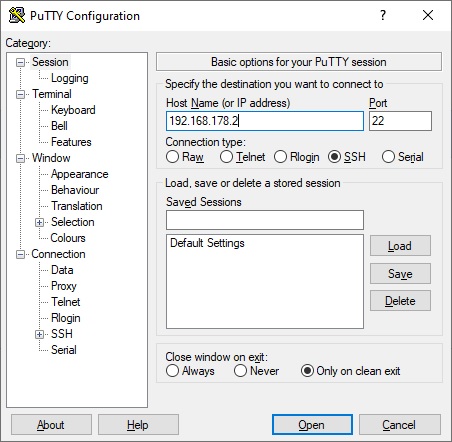
- Connect to your Pi by entering it’s IP address and selecting SSH then click “Open”:
- Login to your Pi.
Username: pi Password: raspberry - I reccomend to update the password by entering
passwdthen press enter and follow the instructions. - Start the Pi-hole installer. Enter
curl -sSL https://install.pi-hole.net | bash, press Enter and follow the instructions to configure it as you like, but don’t change the IP address. - After the installation you get the password for the admin panel. You can change it by entering
pihole -a -p, press enter and select a new one. - End the SSH session by closing Putty.
- Open the FritzBox UI again and go to “Home Network - Network”. Select the tab “Network Settings” and scroll down until you find the section “DNS Rebind Protection “. Enter “pi.hole” and press “Apply”.
- Stay on that page, look for the entry “IP Addresses” and click on “IPv4 Addresses”.
- Enter the Pi’s IP address as “Local DNS server”.
- Because some devices don’t honor this entry, we also set the Pi-hole as the FritzBox’s DNS server. Go to “Internet - Account information” and select the “DNS Server” tab. Select “Use other DNSv4 servers” and enter the Pi’s IP as preferred DNSv4 server. Click “Apply”.
- Open pi.hole/admin. After logging in go to “Settings” and select the “DNS” tab. At the bottom enable conditional forwarding. Enter your FritzBox’s IP (should be 192.168.178.1) and “box” as local domain name. Then click save.
- Congratulations! You successfully set-up your Pi-hole.